Monday, December 26, 2011

New Year, New Indoor Gardens

So, it's been a while since I had all three of my Aerogardens going. With the first day of winter happening four days ago, I figured, what better time to plant my gardens again?

I actually took advantage of some Special Offers that AeroGrow was offering over Christmas. I ended up ordering a few things from them: a new set of grow lights and three seed kits.

For the sale, I had to choose from their pre-packaged (non-custom) kits. I've always wanted to try growing lavender, so that was the first kit I ordered. In all honesty, I'm not sure what I'm going to do with lavender if it grows, but it's just something I've always wanted to grow ever since taking a trip to Washington.

I also wanted herb kits, of course, but I'm not a huge fan of their selection--while their Gourmet Herb Seed Kit (6/7-Pod) used to contain herbs I use like cilantro, parsley, and sage, now it contains things I never use like dill and lemon basil. And of course, if you look back on this blog you'll see that I pretty much exhausted things you can do with mint.

It's then when I remembered that years ago I'd ordered a (non-Aerogarden) herb kit that I never used. I looked through my stuff and surely enough, I found a couple bags of seed I never used.


I ended up getting two of the Grow Anything 1-Season Kit (6/7-Pod). Will my seeds still grow after all these years? That's the million dollar question. Supposedly, seeds will last for years and years when stored in dry and temperate conditions (I had inadvertently stored mine in the perfect conditions, as I dug them up under piles and piles of clutter). The seeds I had happened to be ones I use: basil, parsley, thyme, and oregano. I had chive seeds too, which I don't use too much.

And so I figured I'd do the experiment of the century: could the Aerogarden Grow Anything kit grow herbs seeds that I'd given up for lost? We'll see in a few weeks.

The Grow Anything kit was pretty impressive. I was wondering--why should I pay the same amount ($17.95) for a kit that has NO seeds as I would for a kit that HAS seeds? The answer wasn't clear on their Web site, but was clear as soon as I opened the package.


The kit comes with 7 empty plastic baskets. They're supposed to be split-apart baskets for easy transplanting later, but the ones I got were definitely in one piece.

They also come with grow sponges, which have the look and consistency of soil much more than I remember. They have a little indentation on the top into which you can drop your seeds. And of course, they have those plastic "grow domes" that you put over the seeds as they're germinating.

They also come with 16 5.5mL nutrient packages and 9 8mL packets. That's a lot more than comes with a standard seed kit (my lavender kit only had 8 8mL packets). So for the same price, instead of seeds, they basically make up the difference by including 8 more weeks of feeding.

My silver Aerogarden was still clean and the brass contacts weren't too corroded on the pump or the arm yet, so the pump still worked.


I took a seed bag and generously poured seeds into the grow pods.


I figured I'd load up the seeds--this way there's a better chance of one sprouting, and if all of them sprout, I'll just prune them down to one or two plants.

I put all seven seed pods in (one parsley, two thyme, two oregano, and two basils). I turned on the unit and most of the pods were soaking up the water.

I saw most because I noticed the two pods on the extremely left and right of the unit weren't.


The problem seems to be with the design of the pods. While they're supposedly compatible with all Aerogarden units, my old 7-pod classic clearly didn't like the longer length of the newer seed pods (which work find in newer Aerogardens).

So, I decided to take out the seed pods on the edges (a basil and an oregano) and save them for some other time. I found some old Plant Spacers to put in their place.


The package also comes with labels you put on top of the baskets. The instructions actually said that to affix the labels to the plastic baskets, you should use a hot iron! I had no inclination to burn myself or some hot plastic with an iron, so I decided to just place the label on top and put the grow dome over it (it is important to use the label to regulate the light that gets to the grow dome).

So, we'll see if I have herb plants in a few weeks, or just some moist grow sponges (in which case I'll plan on reusing them and buying some seeds from my local gardening store.

In other news, I planted the lavender plants too.


This was a lot easier and more straightforward than the Grow Anything kit. I just had to pop it into one of my old black Aerogardens, which thankfully was also clean and working.

Wednesday, December 21, 2011

We have Chili Peppers!

For those of who who follow this blog, no, I haven't forgotten about you (or my indoor garden). It's just that my chili plants seemed to be taking forever to grow chilis. Of course, it didn't help that I constantly forgot to water them :P

Happily, my Aerogarden Extra (formerly known as my VeggiePro) is raised all the way to the top with the two remaining chili plants.


In fact, the two plants had grown so much that I had to chop off the entire top, which was growing into the grow lights. The result was this lovely bouquet, suitable for a blushing bride.


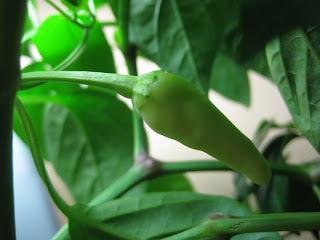
Lo and behold, after what seems like an eternity, there are some beautiful peppers on the tree like Christmas lights. Here's a bunch of them.


Here's an especially pretty one:


Now...off to look for some chili recipes. Anyone have any suggestions?

Tuesday, November 8, 2011

A bit of a roadblock

So, my pepper plants had been doing very, very well. The early pruning turned out great, as my four pepper plants grew stronger than ever, avoiding the "top heaviness" that doomed my last batch.

When I checked the plants the other day, though, I was horrified to see that the leaves were wilting.


I realized what had happened. The plants had grown so fast that they sucked the water all up, until it was bone dry. And it all happened so fast the "Water Low" indicator didn't even have time to light up.

I quickly filled the basin with water, but it seems the damage had been done. On two of the plants, the leaves had already wilted past the point of being salvagable. Strangely, the other two plants were doing just fine. My guess is that these two plants had sucked all the water for themselves, leaving their brethren parched.


I plucked all the dead leaves off, but I noticed that there were still tiny little leaf growths on a few of the joints of the branches trying their best to pop up. So I gave the plants a huge pruning, cutting off the branches with the dead and dying leaves. This left me with a couple sticks:


I poured all the water out and refreshed it with clean, warm water and fresh nutrients. The lesson learned, of course, is not to rely on the low water indicator, and to remember the check the water daily when the plants start getting big. I also noticed that the airstone wasn't really aerating the water very well, so I replaced that too.

We'll see if the little guys have some resilience after almost dying of thirst!

Sunday, October 16, 2011

Growing Aerogarden Chili Peppers "By the Book" this time

I'm happy to report the indoor chilis are doing pretty well.


Having said that, a lesson I learned quite clearly from last time is to do it "by the book"...literally. Last time, I let the pepper plants grow and neglected to prune them, which resulted in a bunch of top-heavy plants that ended up collapsing.

This time, I took the instructions to heart. First, I thinned out the plants so that each pod only had one plant. Of course, this meant chopping off one and in some cases two very healthy plants to allow their stronger sibling to take over the whole pod.


As hard as it was to do that, the harder part came in the next step, where for each of the four remaining plants, I had to chop off all the growth over the third "stem".


This was especially hard, since the plants looked so healthy and one even started to have little flowers on them! But again, learning from the last time it's important to make sure the base of the plant is strong. In some ways, pruning the plant like this is a lot like bonsai--on an outdoor plant you'd let it grow and grow, but indoors you need to shape it so that it grows to proportions that work indoors.

Here are how my trimmed plants look now:


In other news, I am on the cusp of officially retiring my other Aerogarden, which was still hanging on with one parsley plant and one basil plant. In an odd turn of events, I noticed that the plants were dying and that strangely there was a ton of dried gunk caked-on the front of the Aerogarden unit. I realized that the pump had failed and somehow the minerals in the nutrients were evaporating and forming on the outside and by the pod openings. When I examined the unit, the contacts on the arm that connect to the pump had completely oxidized.

I transplanted the parsley into a pot. As for the basil, it's not in great shape so I figure I'll let it ride in the Aerogarden (which I got the pump working for again) a few more weeks and see what happens.

Thursday, September 15, 2011

I noticed it's a little chili today.

Actually, two little chilis :)


So we're off to a good start, although I see nothing yet from the two Red Fire chili pods, which is the one I'm most interested in (I do a lot of Asian cooking). Hope I won't have to get a replacement for the replacement :P


Wednesday, September 7, 2011

Chili, Take Two

I recently went to the fabulous Brooklyn Botanical Garden. Being an indoor garden nut, every time I go to a botanical garden, I always try to seek out the herb garden.

Brooklyn's herb garden is phenomenal. One of the highlights is a huge patch of chili peppers. The variety of pepper seemed exactly the same as my erstwhile Aerogarden peppers, down the the shapes of the leaves. Difference, of course, is that there were a LOT of peppers.

This inspired me to get off my keister and replant those four Aerogarden pods once and for all. Again, taking the lessons learned from the last batch, I'm hoping that my indoor gardening experience this time goes a little better.

The first step was doing another thorough cleaning of the unit. One of the tricky things about Aerogardens is that cleaning is a royal pain in the tuckus. Still, a good scouring pad and dishwater soap does the trick pretty well.

The next step was refilling my Aerogarden with water. I plugged it in to make sure the Airstone was still working (I'd purchased a 5 Pack of Airstones earlier, so I had four left, but happily, this one seemed to still be bubbly).


Next step was opening the box of replacement pods that Aerogrow had sent me. 


You all know the rest. Learning from my last experience, I put the pods as far apart from each other as possible, and I used some plant spacers from my old Aerogarden tomatoes to protect the empty holes from dirt and critters (you can also purchase a Plant Spacer Kit from Aerogarden).


And so we'll start attempt two, remembering the lessons of pruning, pollinating, and cleaning this time!  

Thursday, September 1, 2011

Icky Neon Green Mushrooms in my Tomato Plants

Well, after my salsa post of May, I harvested another batch of cherry tomatoes. This is the tomato plant that won't give up--it's already on the fourth or fifth generation, having had one or two generations of tomatoes from when it was in the Aerogarden, and another two or three when I transplanted it to a flower pot on my kitchen windowsill. The tomato flowers are already out for the sixth generation of harvest.


But lately I noticed a bit of a revolting development in the houseplant soil.


Thanks to the Internet (where would I be without you?) I found out what this was. It's a fungus called Leucocoprinus birnbaumii. It tends to invade houseplants in the summer months when the air is warm, moist, and humid (we've had a LOT of rain in the New York area lately). The spores will travel through the air or hitchhike a ride on clothing. I'm guessing these guys got started through a crack I had in my kitchen window. 

The good news is, the mushrooms are not particularly dangerous (unless you eat them, which I have no intention of doing). There are a couple ways to get rid of them. The first and more important thing is to cut off the caps as quickly as possible. Without doing this, the spores can get into your air and get into other houseplants. 

Other remedies range from replacing the soil to applying fungicide to the soil, all of which have varying degrees of effectiveness. 

One thing I definitely need to do is change the conditions to be less humid and wet. Luckily for me, the only other plants that were near this one were cacti and succulents, which will be fine without water and humidity for a long time. My main houseplants are in the other room, and I think I caught these just in time before the spores went all over the place. 

Anyway, I decided that it's not worth it to try to salvage the tomato plant, so it's time to say good bye. Amazingly, I'd started this plant almost exactly a year ago, and it easily has been the most successful of all my Aerogarden tomato experiments. 

Monday, August 29, 2011

What I did over summer vacation...

How time flies. Seems that it was only yesterday I was noshing on my indoor garden salsa.

I realized I never gave an update on my Aerogarden chili peppers since they were but seedlings. Well, the story is not great. Of seven plants, only two ended up surviving. Ironically, the reason that two of the plants didn't make it is because the overachieving plant ended up sucking up all the nutrients and blocking the smaller plants from getting light.


The big plant did bloom a ton of flowers, but it seems that they were all falling off without bearing fruit. Finally, the big plant produced one chili, which I was very proud of.


Alas, despite a ginormous plant that ended up being the size of Cleveland, only two chilis ended up growing in total. Worse, the bigger plant ended up growing so big that it even choked the light out from the slightly smaller plant, before eventually falling from its own weight (despite my holding it up with all my trellises). It was like some strange plant murder-suicide plot. In any case, it had gotten to the point that when I went on two West Coast trips, leaving the plants to fend for themselves with no water or nutrients. When I came back the plants were no more. 

Still, if you've been following this blog at all you'll know I'm not a quitter! I tossed the underperforming plants and wrote to Aerogarden, asking if they could send replacements pods for the ones that didn't grow. I've always been incredibly impressed with them, because they sent over three new pods, a mini jalapeno and two red fires. I still have an extra purple super hot from the original package. 

And so I'll be starting all over, taking in mind the lessons I learned from this go around. Among other things:

1)  Prune, prune, prune at 3-4 weeks. One thing I didn't do last time was to prune the plants at 3-4 weeks. This is what caused the one big plant to grow out of control and eventually finish off all its siblings. In retrospect, while it seems like its a waste to chop off healthy leaves, what you're doing is strengthening the main stem so that it can be stronger and support more branches. Plus, the top leaves you chop off would just grow into the light and be burned anyway. 

2) Prune leaves. Some of the leaves grew so big they ended up overwhelming the entire garden. In retrospect, all they do is suck out more water and nutrients. The next go around, any leaf that gets too big is going to be plucked off.

3) Pollinate the flowers. I've had experience with this with tomato plants, where you shake the plants to pollinate them (actually, my preferred method is to tap them with my fingernails until I see a little cloud of dust coming from the flower). With the last go-around of the chili plants, I must have started this too late, as every time I shook the plants the flowers flew right off. I think the right thing to do is to start even when the flowers are at bud form, and do it every other day when the lights are on.

4) Remove dead leaves. As the plants grew and grew and had nothing to show for them, I got a little lazy about cleaning the area on the garden surface and pruning wilting leaves on the plant. This can cause all kinds of icky stuff to form, making it an eyesore and making cleanup rather unpleasant. 

5) Read the manual. All of the tips above are in the handy manual that Aerogrow gives with the seed kits. Admittedly, I had grown a little lazy, and didn't bother to read them. Even if you know what you're doing, it never hurts to give yourself a refresher.

So, having said all that, I've already washed and sanitized my Aerogarden VeggiePro (or Aerogarden Extra as it's called now), and I'll be planting my 4 chili seed pods this week. 


Monday, May 23, 2011

Fresh Homemade Salsa with Aerogarden crops

T. Poole left a comment on my May 9 post recommending making salsa out of my Aerogarden harvest. I decided to take this advice and looked up a great salsa recipe on Allrecipes.  To my delight, it used lots of tomatoes and lots of cilantro.

So, today was the day I finally harvested my crop of cherry tomatoes, which started in my Aerogarden VeggiePro (now the AeroGarden Extra), and then was transplanted into a big flower pot by the kitchen window. Here's what they looked like:


Next step was harvesting the cilantro. If you recall, I have cilantro growing in two places: the Aerogarden unit...


...and the extra seeds, I planted in the flower pot next to the cherry tomatoes


For those of you keeping score at home, the cilantro in the Aerogarden unit grew at least 2-3x faster than the one in soil.

I took my cherry tomatoes and chopped them.


Next,  I chopped up the cilantro:


I added salt, garlic, onions, lime juice, and chili peppers to the tomatoes and the cilantro into a bowl (I couldn't find cerrano chiles, so I used long red hot chilis I found in my local supermarket). Then, I put it into the refrigerator for an hour.

When it came out, here's what it looked like.


I'll be honest, I wasn't expecting much. But I kid you not, this was the most amazing tasting salsa I've ever had. It was light, fresh, and with a nice kick from the chilis, not at all like the thick gooey salsa you get in a jar, nor even like the over-done salsa you get at those fast food Mexican restaurants.

I almost polished off a whole bag of whole grain nachos in one sitting with this. And it was satisfying to know that half of it was made with things I had grown in my own kitchen.

This was the first, but will not be the last time I make this. Thanks to T. Poole for the suggestion!

Tuesday, May 17, 2011

Seafood Pasta with lots of basil, thyme, and parsley

If you've been reading this blog, you'll know that I'm always on the lookout for recipes which will use up the herbs that keep growing out of the Aerogarden (which looked like this as of last week)


As you can see, it's a jungle out there, and worse, the more aggressive plants like the basil were choking the light from the smaller plants (believe it or not, all the basil you see in the picture is coming out of just one plant!)

Going to good ol' AllRecipes.Com, I found a recipe for Cajun Seafood Pasta. It used 1 cup of chopped parsley (the parsley in the Aerogarden is still quite anemic, but I still have the potted parsley which grew back from last time), as well as a tablespoon of basil and a tablespoon of chopped thyme. 

So, I started chopping. I was pretty liberal with the basil:


As for the thyme, even after giving a major haircut to both thyme plants, I was able to get a whole tablespoon together.


The recipe called for making a cream sauce, using two cups of real cream. I'm always a little amused by dieters who will eschew ice cream, only to eat bowl after bowl of pasta which probably contains more cream! 


Toss with some fettucine, fresh shrimps and scallops, this was a recipe that was really worthy of the 4 1/2 stars it got from 657 AllRecipes users. I didn't really see where the "Cajun" came in, as even with three kinds of pepper I didn't really taste much of a kick. Still, it tasted really, really good.

Friday, May 6, 2011

Welcome to the Jungle

I've been writing this blog so long I realize I probably used that line before. But the herb garden is looking very much like a jungle. The basil is growing out of control, and the thyme and the cilantro and sage are all growing so fast they're getting tangled with one another. I've already trimmed the basil twice, as it kept growing into the light. I need to try to find some good herb recipes soon.


Here's something very cool--the chili is growing flowers now! One of the varieties has these little white flowers:


While the other variety has beautiful little purple flowers.


One thing that's a little worrisome is that a LOT of the flowers are just dropping off the plant. I'm not worried yet because there are a whole lot of flowers right now. 

The plants are growing incredibly fast, so much so that one of the plants bent over due to the weight of the leaves. 


You can see it at the left-most plant. The stem didn't snap, but it did bend a lot. I'm leaving it as-is to see if it'll straighten out on its own. 

Remember the cherry tomato plant? Here's how big it's gotten:


It's funny, the original plant (to the left) is really not doing anything, but the one branch to the right has extended and is responsible for over 20 cherry tomatoes now. It's all still being held up in the air by the Aerogarden Trellis Coils.  

I figure in the coming weeks, I will start cooking again. I'm checking to see if I can find a recipe that uses tomatoes, sage, basil, cilantro, and thyme!